
The Suppliers Management in Cash Flow Inventory is a robust tool within the Purchase Module, designed to streamline supplier management, track financial transactions, and facilitate procurement processes.
This documentation provides an in-depth guide to the module’s interface, features, and functionalities, ensuring users can manage supplier data efficiently and optimize their business operations.

1. Introduction to the Suppliers Module
The Suppliers Module is a centralized hub for managing all supplier-related activities in Cash Flow Inventory. It enables businesses to:
- Maintain detailed supplier profiles, including contact and financial information.
- Monitor payable and receivable balances.
- Automate purchase planning based on demand.
- Import and export supplier data with AI-powered assistance.
- Navigate related records like orders, bills, and payments seamlessly.
Accessible via Dashboard > Purchase > Suppliers, this module integrates with other system components to provide a holistic procurement management experience.
2. Accessing the Suppliers Module
To access the Suppliers Module:
- Log in to your Cash Flow Inventory account.
- From the Dashboard, locate the Sidebar Navigation on the left.
- Click the Purchase module (represented by a shopping cart icon).
- Select Suppliers from the expanded sub-menu (highlighted when active).
Note: The module’s placement under Purchase reflects an updated structure, previously located under Dashboard > Purchase > Suppliers, enhancing its alignment with procurement workflows.
3. Interface Overview
The Suppliers Module interface is divided into three primary sections:
- Header Bar: Displays branding, user actions, and notifications.
- Sidebar Navigation: Provides access to modules and sub-modules.
- Main Content Area: Contains supplier data, filters, and interactive elements.
3.1 Header Bar
- Branding: Features the “CF” logo and instance name (e.g., “Demo Name”) in white text on a dark blue background.
- Action Button: “+ New” (white button with blue text) for creating new suppliers or related records.
- User Elements:
- Webinars: A question mark icon linking to help resources or training.
- Notifications: A bell icon with a badge (e.g., “0” unread notifications).
- User Profile: An icon with user initials (e.g., “MA”).
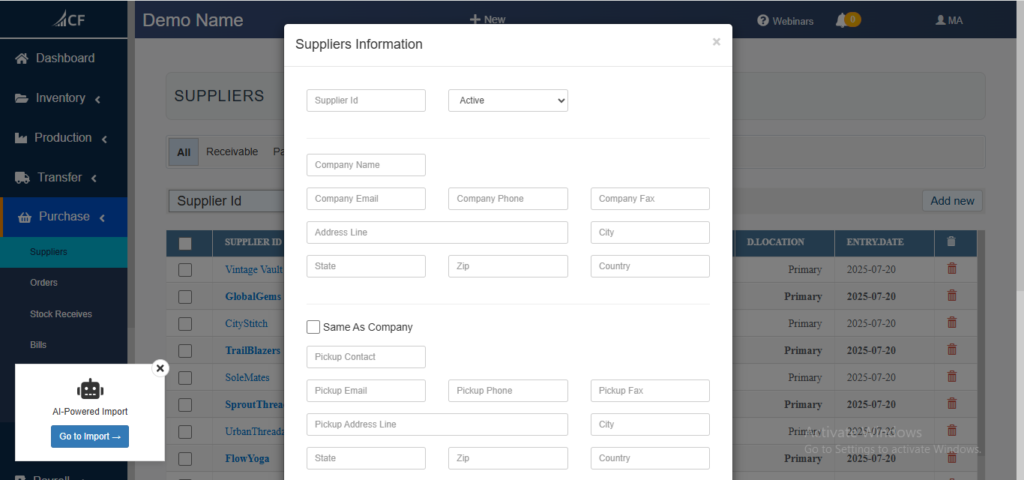
3.3 Main Content Area
- Title: “SUPPLIERS” in bold, uppercase, dark gray text.
- Filtering Tabs:
- ALL (active by default), RECEIVABLE, PAYABLE, ON_RECEIVE, TO_PAY, TO_ORDER, DEAD_STOCK.
- Action Buttons:
- IMPORT: Gray button for importing supplier data.
- EXPORT: Gray button for exporting supplier lists.
- Search Bar: Dropdown labeled “Supplier ID” with “TYPE…” placeholder, paired with a “Filter” button.
- Add New: Blue button to create a new supplier.
4. Supplier Data Table
The supplier data table is the central feature of the main view, presenting supplier information in a sortable, interactive format.
4.1 Table Columns
| Column | Description | Example Data |
|---|---|---|
| Checkbox | Select rows for bulk actions | – |
| SUPPLIER ID | Unique supplier identifier (sortable) | VintageVault |
| COMPANY | Supplier company name | Vintage Vault Accessories |
| BALANCE_TYPE | Payable or Receivable | Payable |
| BALANCE | Current balance amount | 0.00 |
| D_LOCATION | Default location | Primary |
| ENTRY_DATE | Date supplier was added | 2025-07-20 |
| Action | Trash bin icon for deletion | – |
4.2 Features
- Sorting: Click column headers (e.g., SUPPLIER ID) with arrow icons to sort ascending/descending.
- Bulk Actions: Checkboxes allow selecting multiple rows for actions like deletion or export.
- Deletion: Trash bin icon deletes individual suppliers (disabled if linked to transactions).
Sample Suppliers:
- VintageVault (Vintage Vault Accessories, Payable, 0.00, Primary, 2025-07-20)
- GlobalGems (Global Gems Accessories, Payable, 0.00, Primary, 2025-07-20)
- TrailBlazers (TrailBlazers Outdoor Footwear, Receivable, 0.00, Primary, 2025-07-20)
5. Supplier Profile
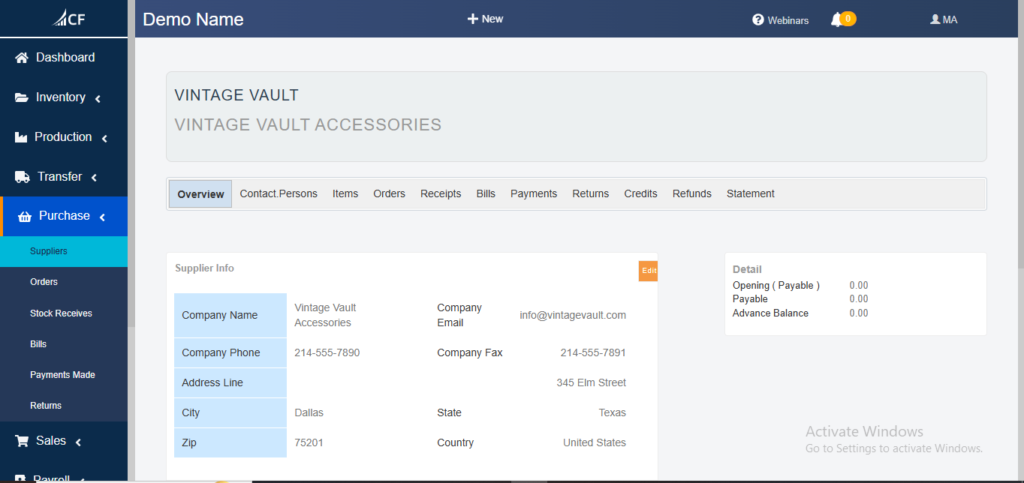
Clicking a Supplier ID (e.g., “VintageVault”) opens the Supplier Profile, offering a detailed view of supplier data and related activities.
5.1 Profile Header
- Supplier Code: Bold, uppercase (e.g., “VINTAGE VAULT”).
- Company Name: Secondary text (e.g., “Vintage Vault Accessories”).
- Actions:
- + New: Create related records (e.g., purchase orders).
- Edit: Modify supplier details (edit icon).
5.2 Navigation Tabs
Tabs provide access to related data:
- Overview (active by default): General supplier info and financials.
- Contact Persons: List of supplier contacts.
- Items: Products sourced from the supplier.
- Orders: Purchase orders history.
- Receipts: Stock receipt records.
- Bills: Supplier invoices.
- Payments: Payment history.
- Returns: Return transactions.
- Credits: Credit memos.
- Refunds: Refund records.
- Statement: Financial statement.
5.3 Overview Tab
- Supplier Info Panel:
- Company Name: Editable field (e.g., “Vintage Vault Accessories”).
- Company Phone: e.g., “214-555-7890”.
- Company Email: Clickable link (e.g., “info@vintagevault.com“).
- Company Fax: e.g., “214-555-7891”.
- Address: e.g., “345 Elm Street, Dallas, Texas, 75201, United States”.
- Financial Summary:
- Detail: Orange clickable link for detailed financials.
- Opening (Payable): e.g., “0.00”.
- Payable Balance: e.g., “0.00”.
- Advance Balance: Available in some views (not shown in screenshot).
Note: The email link enables direct communication, enhancing workflow efficiency.
6. Managing Suppliers
6.1 Adding a New Supplier
- From the Suppliers main view, click “ADD NEW”.
- Enter required fields:
- Supplier ID (e.g., “NewSupplier”).
- Company Name (e.g., “New Supplier Co.”).
- Optional fields:
- Payment Terms, Opening Balance, Default Location.
- Click “Save”.
6.2 Editing a Supplier
- Navigate to Dashboard > Purchase > Suppliers.
- Click the Supplier ID (e.g., “VintageVault”).
- Click the edit icon in the profile header.
- Update fields (e.g., phone, email) and click “Save”.
6.3 Deleting a Supplier
- In the supplier table, click the trash bin icon next to the supplier.
- Confirm deletion.
Restriction: Suppliers with linked records (e.g., orders) cannot be deleted; mark as inactive instead.
7. Bulk Operations
7.1 Bulk Actions
- Select multiple suppliers using checkboxes.
- Options:
- Mark as Active/Inactive.
- Delete (if no linked transactions).
7.2 Import/Export
- Import:
- Click “IMPORT” to launch the import wizard.
- Upload a CSV/Excel file and map fields.
- Export:
- Click “EXPORT” to download the current table view or selected suppliers.
8. AI-Powered Import
The AI-powered import feature enhances data entry efficiency:
- Click “IMPORT” in the main view.
- A pop-up appears with:
- Robot icon and “AI-Powered Import” title.
- “Go to Import” button (blue with arrow).
- Proceed to upload and let AI map/validate data.
Benefit: Reduces manual effort and errors in importing supplier lists.
9. Payable and Receivable Management
- Tabs: Filter suppliers by status (e.g., RECEIVABLE, PAYABLE).
- Views:
- List suppliers with outstanding balances.
- Track overdue payments or receivables.
- Usage: Apply receivable balances to purchases or payments.
Example: Use the PAYABLE tab to prioritize overdue supplier payments.
10. Automated Purchase Planning
The module supports demand-based purchase automation:
- Go to the “TO_ORDER” tab.
- Review suppliers needing orders based on stock levels.
- Click to generate a purchase order, then edit and confirm.
Underlying Logic:
- Safety Stock: (Max daily usage × Max lead time) – (Avg daily usage × Avg lead time).
- Reorder Point: Safety Stock + (Lead time × Avg daily usage).
11. Search and Filtering
- Search Bar: Enter Supplier ID or keywords in “TYPE…” field.
- Filters: Apply via the “Filter” button or tabs (e.g., TO_PAY).
- Real-Time: Results update instantly.
Example: Search “Vintage” to find “Vintage Vault Accessories”.
12. Integration and Additional Features
- ERP Sync: Connects with accounting systems for seamless data flow.
- Notifications: Alerts for low stock or due payments via the bell icon.
- Permissions: Role-based access controls supplier data visibility.
13. Best Practices
- Naming: Use consistent Supplier IDs (e.g., “VINTAGEVAULT”).
- Data Maintenance: Archive inactive suppliers regularly.
- Automation: Leverage TO_ORDER and notifications for efficiency.
- Sync: Integrate with external systems for accurate financials.
14. Potential Improvements
- Financial Details: Expand the Overview tab’s financial summary with metrics like total orders or payments.
- AI Guidance: Add a tutorial for the AI-powered import feature.
- Clarity: Resolve unclear notes (e.g., “Active Windows” in screenshot 1) with proper explanations or removal.
15. Conclusion
The Suppliers Module in Cash Flow Inventory is a powerful, user-friendly tool for managing supplier relationships, financial tracking, and procurement automation. With its intuitive interface, AI-powered features, and comprehensive data views, it empowers businesses to optimize cash flow and supplier operations effectively.
Found this helpful? Share it:
The Suppliers Management in Cash Flow Inventory is a robust tool within the Purchase Module, designed to streamline supplier management, track financial…
The Suppliers Management in Cash Flow Inventory is a robust tool within the Purchase Module, designed to streamline supplier management, track financial…
The Suppliers Management in Cash Flow Inventory is a robust tool within the Purchase Module, designed to streamline supplier management, track financial…