How to Track Inventory for Bundles and Kits You Sell Online
Virtual bundles and pre-built kits move component stock at different moments. Here is how each one works, what your online store shows, and a worked example you can copy.
On this page
- Key takeaways
- Virtual bundles vs pre-built kits: how each moves component stock
- Virtual bundles (assemble on demand)
- Pre-built kits (assemble to stock)
- Decision rules: which one to use
- Worked example: one weekend of bundle sales
- Costing the kit
- How to set up and track bundles: step by step
- Copy-ready bundle setup checklist
- Common mistakes when tracking bundle inventory
- Edge cases generic answers skip
- Returns and partial refunds
- Substitutions
- Unpaid and cash-on-delivery orders
- Expiry dates inside kits
- Revenue split for reporting
- How to do this in Cash Flow Inventory
- Frequently asked questions
- How do I show the right stock for a bundle on my online store?
- What is the difference between a bundle and a kit?
- Should a bundle have its own SKU?
- How do I calculate the cost of a bundle?
- How many kits should I pre-build?
- Start tracking your kits properly
To track inventory for bundles, keep stock on the components and treat the bundle as either a virtual bundle, whose available quantity is calculated from its components and deducted at the moment of sale, or a pre-built kit, which is assembled ahead of time and counted as its own stocked item. The choice decides when component stock moves, what your online store shows as available, and where overselling can creep in.
Most short answers stop at that definition. This page goes further. You get a worked example with real numbers showing what happens to shared components over one busy weekend, a formula for bundle availability, decision rules for virtual versus pre-built, a build-and-publish procedure, and the edge cases that catch out small online sellers.
The last section shows how to run the pre-built kit route in Cash Flow Inventory, using bills of materials and work orders, so the kit carries a true cost and the store only ever shows kits that physically exist.
Key takeaways
- A virtual bundle has no stock of its own: its availability is the smallest number of complete sets the components can make, and a sale deducts each component.
- A pre-built kit is assembled in advance: building it consumes components, and the store sees the kit as a normal stocked product.
- Shared components are the main risk. Virtual bundles can show the same units on several listings; pre-built kits can lock units away from single-item sales.
- Cost every kit from its components plus packaging and assembly labour, never from its selling price.
- Keep components off the storefront unless you also sell them singly, and decide in writing how returned kits are handled.
Virtual bundles vs pre-built kits: how each moves component stock
Both methods start from the same thing: a list of components and the quantity of each that goes into one bundle. That list is your recipe, and getting it right matters more than any setting in your software.
Virtual bundles (assemble on demand)
A virtual bundle is a listing, not a physical item on a shelf. When a customer orders it, the order deducts one of each component (or whatever quantities the recipe says), and the picker gathers the parts at packing time. Nothing is counted as “bundle stock” because none exists until the order is packed.
What the store sees is a calculated number. Your system works out how many complete bundles the components can make right now and pushes that figure to the listing.
Bundle available = the smallest of (component available ÷ quantity per bundle, rounded down) across all components
The parts: component available is on-hand stock minus units already held for open orders; quantity per bundle comes from the recipe; you round down because half a set cannot ship; and the smallest result wins because the scarcest component limits everything.
Pre-built kits (assemble to stock)
A pre-built kit is assembled before anyone orders it. A build (often called a work order or assembly) consumes the components and produces a counted quantity of the kit, which then sits on a shelf with its own SKU. When a customer orders it, only the kit’s stock goes down; the components were already used when you built it.
What the store sees is simple: the kit’s on-hand quantity, like any other product. That makes pre-built kits easy to sync, count and pick, but it means units of a component inside a sealed kit are no longer available for single-item sales.
Decision rules: which one to use
- Choose pre-built when the kit needs real assembly time (gift wrapping, shrink-wrap, printed inserts), when you sell through channels or a courier pickup that needs packed stock ready, or when you want a stock count of kits you can physically verify.
- Choose virtual when packing a bundle takes no more effort than picking its parts, when components also sell well on their own, or when you run many bundle combinations from a small set of parts.
- Use a hybrid (pre-build a small buffer, keep the rest as loose parts) for seasonal gift sets: build enough to cover expected kit sales until your next build session, and leave the rest loose.
- Avoid pre-building anything containing short-dated components unless you can sell the kit before the earliest expiry date inside it.
Worked example: one weekend of bundle sales
Example: a shop selling skincare gift sets online. A hypothetical shop, Lantern & Leaf, sells three components on their own and in two bundles. The Starter Set is 1 cleanser + 1 serum + 1 moisturiser + 1 gift box. The Duo is 1 serum + 1 moisturiser. Opening stock: cleanser 40, serum 25, moisturiser 60, gift box 30.
Under the virtual method, the store calculates availability. The Starter Set shows min(40, 25, 60, 30) = 25. The Duo shows min(25, 60) = 25. Serum singles show 25. Notice that all three listings show the same 25 serums. That is fine only if every sale deducts serum instantly and the new figures reach the store before the next order.
Under the pre-built method, the shop builds 15 Starter Sets and 5 Duos before the weekend. Building uses 20 serums, 20 moisturisers, 15 cleansers and 15 boxes.
Over the weekend, customers order 12 Starter Sets, 4 Duos and 6 single serums.
| Item | Virtual: start | Virtual: after sales | Pre-built: after build | Pre-built: after sales |
|---|---|---|---|---|
| Cleanser (loose) | 40 | 40 − 12 = 28 | 40 − 15 = 25 | 25 |
| Serum (loose) | 25 | 25 − 12 − 4 − 6 = 3 | 25 − 15 − 5 = 5 | 5 − 6 = −1 (one order short) |
| Moisturiser (loose) | 60 | 60 − 12 − 4 = 44 | 60 − 15 − 5 = 40 | 40 |
| Gift box (loose) | 30 | 30 − 12 = 18 | 30 − 15 = 15 | 15 |
| Starter Set | shows 25 | shows min(28, 3, 44, 18) = 3 | 15 | 15 − 12 = 3 |
| Duo | shows 25 | shows min(3, 44) = 3 | 5 | 5 − 4 = 1 |
Check the serums: in the virtual column, 12 + 4 + 6 = 22 used, leaving 3 of the original 25. In the pre-built column, 20 went into kits and 5 stayed loose. The kits that sold used 12 + 4 = 16 of the 20, so 4 serums are still sealed inside 3 Starter Sets and 1 Duo.
The lesson: the virtual method served every order, but only because each sale updated all three listings in time. The pre-built method was safe for the kits but left the shop one single serum short while 4 serums sat locked in unsold kits. Had the store been syncing loose serum stock properly, the sixth single would have shown as sold out rather than oversold.
Costing the kit
Lantern & Leaf’s component costs are cleanser 3.10, serum 5.40, moisturiser 4.20 and gift box 0.90 (in its own currency). It plans builds in batches of 10 Starter Sets, and packing takes 40 minutes per batch at a labour rate of 9.00 per hour.
| Cost line (one batch of 10 kits) | Calculation | Amount |
|---|---|---|
| Components | 10 × (3.10 + 5.40 + 4.20 + 0.90) = 10 × 13.60 | 136.00 |
| Packing labour | 40 minutes = 0.6667 hours × 9.00 | 6.00 |
| Batch total | 136.00 + 6.00 | 142.00 |
| Cost per kit | 142.00 ÷ 10 | 14.20 |
| Gross margin at a price of 29.00 | (29.00 − 14.20) ÷ 29.00 | 51.0% |
If the shop had costed the kit at components only (13.60), every kit sale would overstate profit by 0.60. You can rerun the margin with your own figures in the gross margin calculator.
Under accounting standards such as IAS 2 Inventories, the cost of finished goods includes costs of conversion as well as materials, which is why packing labour belongs in the kit’s cost.
How to set up and track bundles: step by step
This procedure works for any system and for either method. Where a step applies only to pre-built kits, it says so.
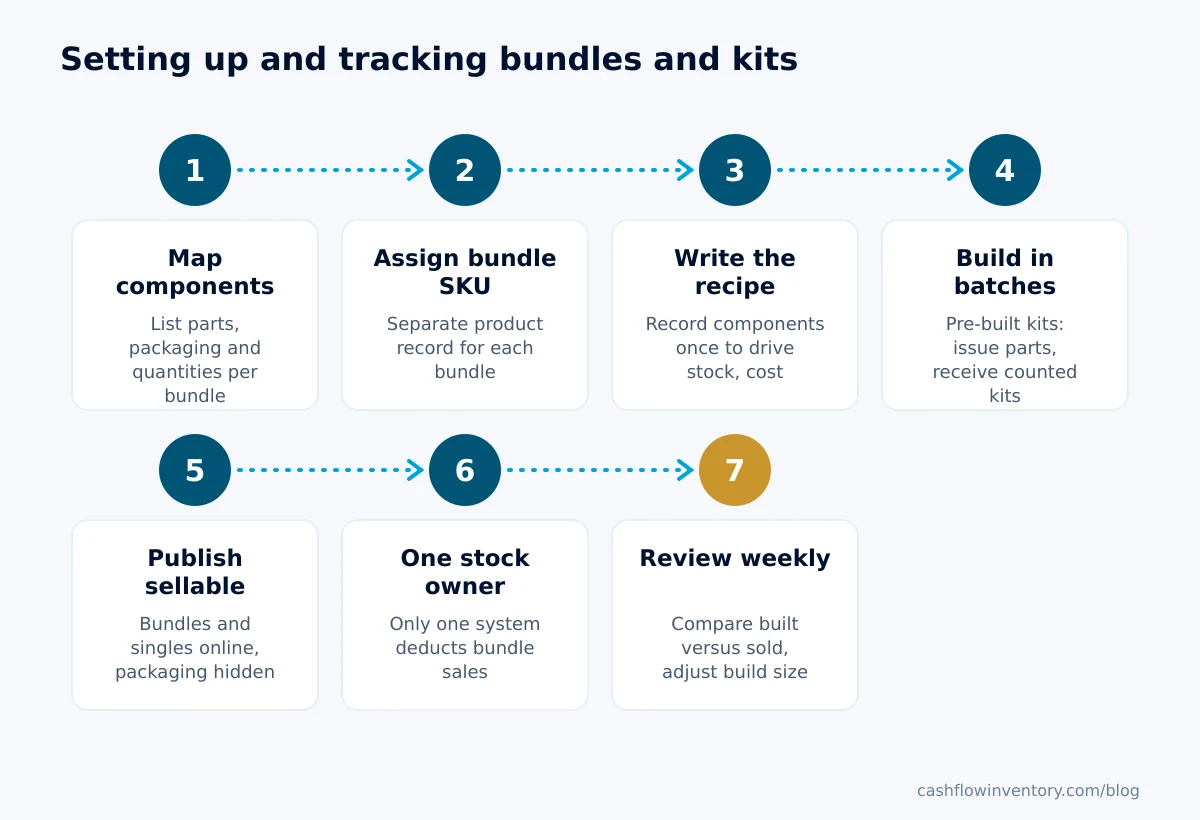
- Map every component. List each bundle, its components and the exact quantity per bundle, including packaging, inserts and free samples. If a free sample leaves your shelf, it is a component.
- Give each bundle its own SKU. The bundle needs a distinct product record so its sales, returns and margin are reported separately from the singles. Never reuse a component’s SKU for a bundle.
- Write the recipe in your inventory system. Record components and quantities once, in one place, so availability and cost both come from the same list.
- Pre-built only: build in batches. Create a build for the number of kits you plan to sell before the next build session. Issue the components, assemble, and receive the finished kits into stock with a count.
- Publish only what customers buy. Put bundles and any singles you sell on the store; keep packaging and pure components off it.
- Let one system own the stock number. Decide whether your inventory system or the store calculates bundle availability, and switch off deductions in the other, so nothing is deducted twice.
- Review weekly. Compare kits built against kits sold, check how many units are locked in unsold kits, and adjust the next build size.
Copy-ready bundle setup checklist
- Every bundle has its own SKU and a written component list with quantities.
- Packaging, inserts and freebies are listed as components with a cost.
- Assembly time and labour rate are recorded for pre-built kits.
- Only one system deducts stock for bundle sales.
- Components not sold singly are hidden from the storefront.
- Shared components are identified, with a minimum loose quantity kept for single sales.
- A written rule exists for returned kits: restock whole, or break down.
- Kit counts are included in your regular stock count.
Common mistakes when tracking bundle inventory
- Tracking the bundle as unrelated stock. Entering “Starter Set: 25” by hand, with no link to components, means selling a set never reduces the serum count. This is one of the most common causes covered in how to prevent overselling.
- Double deduction. A store bundle plugin deducts components and your inventory system deducts them again from the imported order. Pick one owner. The WooCommerce Product Bundles documentation explains how that extension handles bundled item stock, which you need to know before connecting another system.
- Slow sync on shared components. With virtual bundles, three listings showing the same 25 serums is only safe if updates reach every channel quickly. Our guide to WooCommerce stock sync across channels covers the timing problem.
- Forgetting packaging. If gift boxes are not a component, you discover the shortage at packing time, not on the listing.
- Costing at selling price or at a guess. A kit’s cost is its components plus assembly, worked out from the recipe.
- Over-building. Building 50 kits for a weekend that sells 12 locks components away from single sales, as the serum row in the example shows.
- Confusing multi-packs with variants. A “pack of 3” of one product is a bundle of one component with quantity 3, or a pack-size variant. See managing stock for variable products for the pack-size approach.
Edge cases generic answers skip
Returns and partial refunds
For a virtual bundle, a return puts each component back individually, after inspection. For a pre-built kit, decide whether a returned kit goes back as a kit (seal intact) or is broken down into components, and record exactly what you do with a stock adjustment so the counts match the shelf. A partial refund for one damaged item in a kit should still move only that item.
Substitutions
If a component runs out and you swap in another shade or size, the recipe no longer matches what left the shelf. Record the substitution on the order or adjust stock, otherwise the original component looks over-stocked and the substitute looks short.
Unpaid and cash-on-delivery orders
In regions where cash on delivery is common, an unconfirmed bundle order should still hold its units. If it does not, the same serum can be promised twice while the first customer is being called.
Expiry dates inside kits
A kit is only as fresh as its shortest-dated component. Label the kit with that date and sell kits before loose stock of the same component.
Revenue split for reporting
When a bundle is discounted, decide whether you report revenue on the bundle SKU only or allocate it across components. Keep the bundle SKU as the reporting line for margin, and use component movements for stock.
Expert tip: for every shared component, set a minimum loose quantity reserved for single sales (for example, never build kits that would take loose serum below 10). It turns the build-size decision into a simple rule anyone in the team can apply.
How to do this in Cash Flow Inventory
In Cash Flow Inventory, the documented route for kits is the pre-built one: a bill of materials defines the kit, a work order builds it, and the finished kit becomes a stocked item your store can sell. Before you start, Production must be switched on in Settings › General or Settings › Business setup, and the kit and all its components must be stocked items (see item types and the service catalogue).
- Create the kit (for example, Starter Set) and each component as stocked items.
- Open Production › Bills of materials and choose New. Choose the kit as the Item made and enter One batch makes, for example 10.
- Under Components for one batch, choose Add a component, search by name or SKU, and enter each quantity in its base unit: 10 cleansers, 10 serums, 10 moisturisers, 10 gift boxes.
- Under Work (operations), add packing: the Operation, Who does it, the time (40 minutes) and the Rate per hour (9.00). Save. The app confirms the cost per unit, and in this example would roll up to 14.20, which becomes the kit’s catalogue cost for quotations and margins.
- On the BOM, choose Make a work order and enter how many kits to build. The work order copies the materials and operations and scales them. Materials post when they are issued, and the finished kits when they are received.
- Use the Sell online switch to publish the kit, and the components you also sell singly, while gift boxes and other parts stay unpublished.
- Connect your store under Integrations (see stores and marketplaces). Orders arrive as sales orders, and an order that took stock on the store holds those units even while it waits in Sales › Orders › Unpaid web orders, as described in the online store orders guide.
A few rules to know, from the bills of materials guide: each item has one BOM, so a kit with a different gift box needs its own item; there is no scrap percentage on a line, so enter the quantity you really use; an item cannot be a component of itself; and a BOM cannot be deleted while an open work order still makes the item from it.
Frequently asked questions
How do I show the right stock for a bundle on my online store?
For a virtual bundle, the listing should show the smallest number of complete sets your components can make, recalculated after every sale. For a pre-built kit, it shows the kit’s own on-hand count. Either way, only one system should own that number.
What is the difference between a bundle and a kit?
People use the words loosely, but in stock terms a bundle usually means components grouped at the moment of sale, while a kit is assembled in advance and counted as its own item. The difference is when component stock moves: at sale for bundles, at build for kits.
Should a bundle have its own SKU?
Yes. A separate SKU lets you report bundle sales, returns and margin on their own, and stops bundle orders being confused with single-item orders. It also helps you prevent duplicate entries in your catalogue.
How do I calculate the cost of a bundle?
Add each component’s quantity times its cost, add packaging and assembly labour, and divide by the number of bundles in the batch. In the example above, that gives 142.00 ÷ 10 = 14.20 per kit.
How many kits should I pre-build?
Build enough to cover expected kit sales until your next build session, minus kits already on the shelf, and never so many that shared components fall below the loose quantity you keep for single sales. Review it weekly against your sell-through rate.
Start tracking your kits properly
Bundles stop causing oversells and margin surprises once the recipe lives in one place, the build moves component stock, and the store sees only what exists. If you assemble kits before you sell them, Cash Flow Inventory’s production and bills of materials give each kit a real cost and a real count. You can start a free trial and set up your first kit today.